gin框架一套解决
[toc]
介绍
- Gin是一个golang的微框架,封装比较优雅,API友好,源码注释比较明确,具有快速灵活,容错方便等特点
- 对于golang而言,web框架的依赖要远比Python,Java之类的要小。自身的
net/http足够简单,性能也非常不错 - 借助框架开发,不仅可以省去很多常用的封装带来的时间,也有助于团队的编码风格和形成规范
要求
- Go 1.13 及以上版本
安装
要安装 Gin 软件包,需要先安装 Go 并设置 Go 工作区。
1.下载并安装 gin:
go get -u github.com/gin-gonic/gin
💡 补充get参数:
附加参数 备 注 -v 显示操作流程的日志及信息,方便检查错误 -u 下载丢失的包,但不会更新已经存在的包 -d 只下载,不安装 -insecure 允许使用不安全的 HTTP 方式进行下载操作
2.将 gin 引入到代码中:
import "github.com/gin-gonic/gin"
3.(可选)如果使用诸如 http.StatusOK 之类的常量,则需要引入 net/http 包:
import "net/http"
4.创建你的项目文件夹并 cd 进去
如果是用的
mod包,那么并不需要
$ mkdir -p $GOPATH/src/github.com/myusername/project && cd "$_"
5.拷贝一个初始模板到你的项目里
$ curl https://raw.githubusercontent.com/gin-gonic/examples/master/basic/main.go > main.go
网络不行可以直接访问 这里复制到
main.go
6.运行你的项目
$ go run main.go
最后访问即可:
开始
不确定如何编写和执行 Go 代码? 点击这里.
首先,创建一个名为 example.go 的文件
$ touch example.go
接下来, 将如下的代码写入 example.go 中:
package main

import "github.com/gin-gonic/gin"

func main() {
	r := gin.Default()
	r.GET("/ping", func(c *gin.Context) {
		c.JSON(200, gin.H{
			"message": "pong",
		})
	})
	r.Run() // 监听并在 0.0.0.0:8080 上启动服务
}
然后, 执行 go run example.go 命令来运行代码:
# 运行 example.go 并且在浏览器中访问 HOST_IP:8080/ping
$ go run example.go
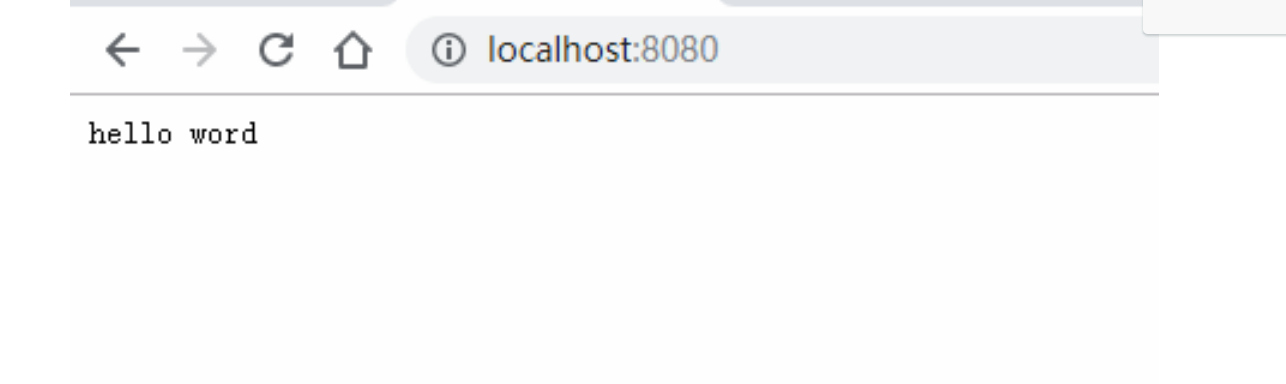
🚀 编译结果如下:
hello word
package main

import (
    "net/http"

    "github.com/gin-gonic/gin"
)

func main() {
    // 1.创建路由
   r := gin.Default()
   // 2.绑定路由规则,执行的函数
   // gin.Context,封装了request和response
   r.GET("/", func(c *gin.Context) {
      c.String(http.StatusOK, "hello World!")
   })
   // 3.监听端口,默认在8080
   // Run("里面不指定端口号默认为8080")
   r.Run(":8000")
}
其他的请求和json
💡简单的一个案例如下:
// gin
package main
import (
"net/http"
"github.com/gin-gonic/gin"
)
func main() {
//创建gin实例
r := gin.Default()
//设置路由:请求方式,路径,处理函数
r.GET("/ping", func(c *gin.Context) {
c.String(200, "这是一个Get ping请求")
c.JSON(http.StatusOK, gin.H{
"message": "pong",
})
})
//Post请求: http://localhost:8080/login 表示向服务器发送登录请求
r.POST("/login", func(c *gin.Context) {
c.String(200, "登录成功,这是一个Post请求")
//获取参数
username := c.PostForm("username")
password := c.PostForm("password")
//返回json数据
c.JSON(http.StatusOK, gin.H{
"username": username,
"password": password,
})
})
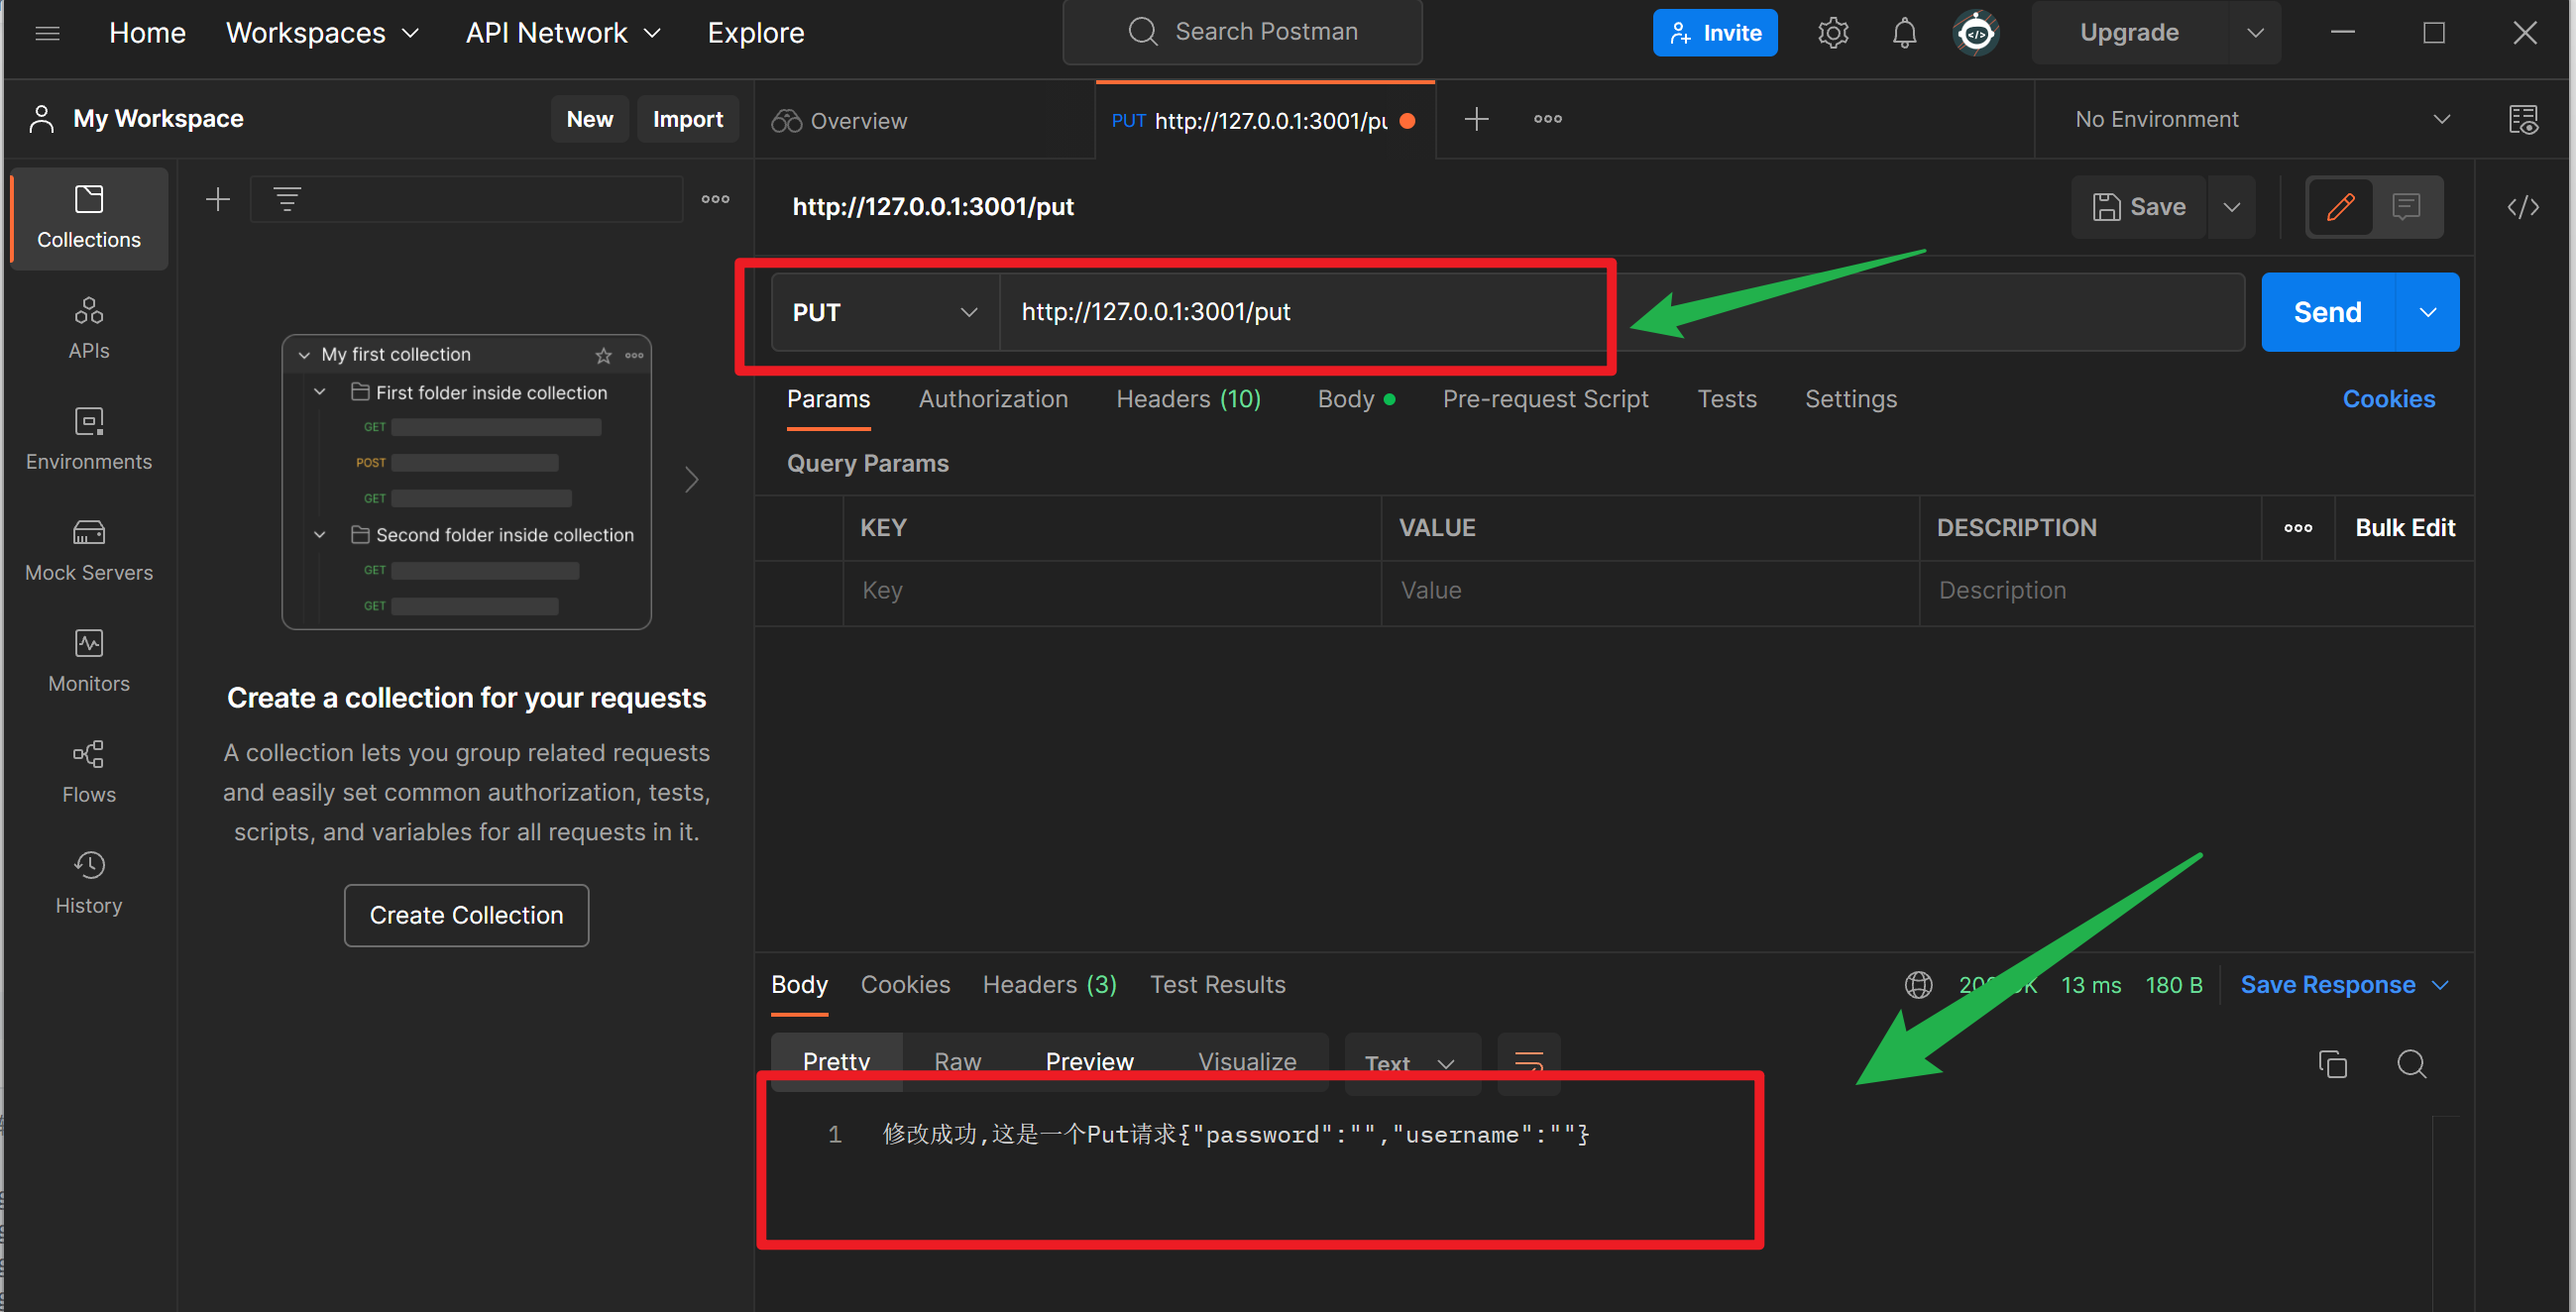
//Put请求: http://localhost:8080/put 表示向服务器发送修改请求
r.PUT("/put", func(c *gin.Context) {
c.String(200, "修改成功,这是一个Put请求")
//获取参数
username := c.PostForm("username") //当存在POST urlenencoded表单或multipart表单时,PostForm返回指定的键,否则返回空字符串'("")'
password := c.PostForm("password")
//返回json数据 : 传入的数据:状态码和空接口类型数据
c.JSON(http.StatusOK, gin.H{ //gin.H是map[string]interface{}的简写,http.StatusOK是200
"username": username,
"password": password,
})
})
//Delete请求: http://localhost:8080/delete 表示向服务器发送删除请求
r.DELETE("/delete", func(c *gin.Context) {
c.String(200, "删除成功,这是一个Delete请求")
//获取参数
username := c.PostForm("username")
password := c.PostForm("password")
//返回json数据
c.JSON(http.StatusOK, gin.H{
"username": username,
"password": password,
})
})
//监听端口
// r.Run() 启动HTTP服务,默认在 0.0.0.0:8080 启动服务
r.Run(":3001") //也可以使用这种方式设置端口
}
🚀 编译结果如下:
PS D:\文档\最近的\awesome-golang\docs\code\go-super\gin> air

  __    _   ___
 / /\  | | | |_)
/_/--\ |_| |_| \_ , built with Go

watching .
!exclude tmp
building...
running...
[GIN-debug] [WARNING] Creating an Engine instance with the Logger and Recovery middleware already attached.

[GIN-debug] [WARNING] Running in "debug" mode. Switch to "release" mode in production.
 - using env:   export GIN_MODE=release
 - using code:  gin.SetMode(gin.ReleaseMode)

[GIN-debug] GET    /ping                     --> main.main.func1 (3 handlers)
[GIN-debug] POST   /login                    --> main.main.func2 (3 handlers)
[GIN-debug] PUT    /put                      --> main.main.func3 (3 handlers)
[GIN-debug] DELETE /delete                   --> main.main.func4 (3 handlers)
[GIN-debug] [WARNING] You trusted all proxies, this is NOT safe. We recommend you to set a value.
Please check https://pkg.go.dev/github.com/gin-gonic/gin#readme-don-t-trust-all-proxies for details.
[GIN-debug] Listening and serving HTTP on :3001
[GIN] 2022/11/01 - 20:45:41 | 200 |            0s |       127.0.0.1 | PUT      "/put"
相应 json 数据并且返回自定义 json 名称
// 定义结构体
type User struct {
	Username string `json:"用户名"`
	Password string `json:"密码"`
}
// jaon
func main() {
	r.POST("/json", func(c *gin.Context) {
		//声明结构体
		a := &User{
			Username: "admin",
			Password: "123456",
		}
		c.JSON(http.StatusOK, a)
		//绑定参数
	})
}
🚀 编译结果如下:
{
    "用户名": "admin",
    "密码": "123456"
}
响应 jsonp 请求
💡简单的一个案例如下:
// 定义结构体
type User struct {
	Username string `json:"用户名"`
	Password string `json:"密码"`
}
// jaon
func main() {
    //相应jsonp数据: http://localhost:3001/jsonp?callback=callback
	r.Get("/jsonp", func(c *gin.Context) {
		//声明结构体
		a := &User{
			Username: "admin",
			Password: "123456",
		}
		c.JSON(http.StatusOK, a)
		//绑定参数
	})
}
🚀 编译结果如下:
callback({"用户名":"admin","密码":"123456"});
加载yaml和xml
// 定义结构体
type User struct {
	Username string `json:"用户名"`
	Password string `json:"密码"`
}
// jaon
func main() {
    //相应xml数据: http://localhost:3001/xml
	r.GET("/xml", func(c *gin.Context) {
		//声明结构体
		a := &User{
			Username: "admin",
			Password: "123456",
		}
		//返回xml数据
		c.XML(http.StatusOK, a)
	})

	//相应yaml数据: http://localhost:3001/yaml
	r.GET("/yaml", func(c *gin.Context) {
		//声明结构体
		a := &User{
			Username: "admin",
			Password: "123456",
		}
		//返回yaml数据
		c.YAML(http.StatusOK, a)
	})
}
🚀 编译结果如下:
#xml:
<User>
    <Username>admin</Username>
    <Password>123456</Password>
</User>

#yml
username: admin
password: "123456"
加载html
//对应html数据: http://localhost:3001/html
r.GET("/html", func(c *gin.Context) {
	//声明结构体
	a := &User{
		Username: "admin",
		Password: "123456",
	}
	//返回html数据
	c.HTML(http.StatusOK, "./web/index.html", gin.H{
		"test": a,
	})
})
gin框架采用的路由库
gin框架中采用的路由库是基于httprouter做的- 地址为:https://github.com/julienschmidt/httprouter
Gin模板渲染
main.go 文件:
package main
import (
"net/http"
"github.com/gin-gonic/gin"
)
type New struct {
Title string `json:"新闻标题"`
Content string `json:"新闻内容"`
}
func main() {
r := gin.Default()
//html: http://localhost:8080/
r.LoadHTMLGlob("templates/*") //表示加载templates文件夹下的所有文件
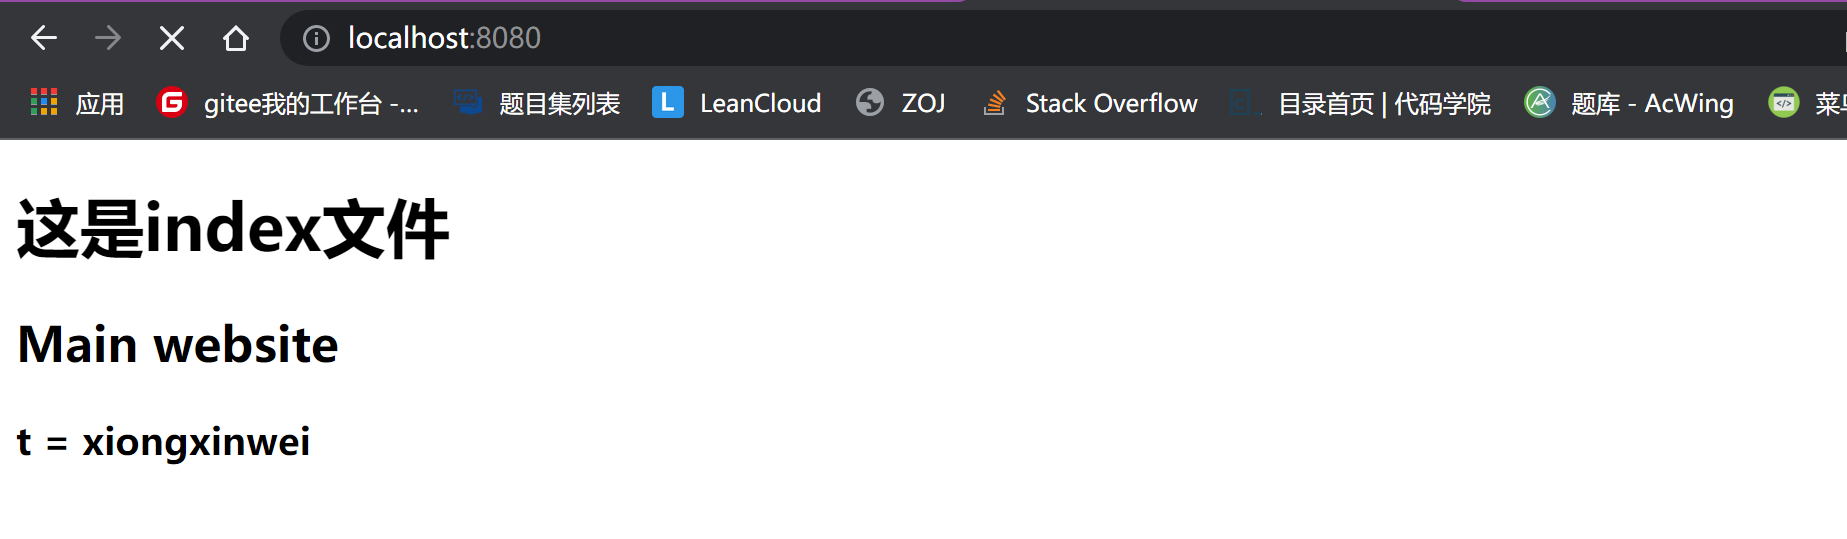
r.GET("/", func(c *gin.Context) {
c.HTML(http.StatusOK, "index.html", gin.H{
"title": "Main website",
"t": "xiongxinwei",
})
})
//html: http://localhost:8080/news
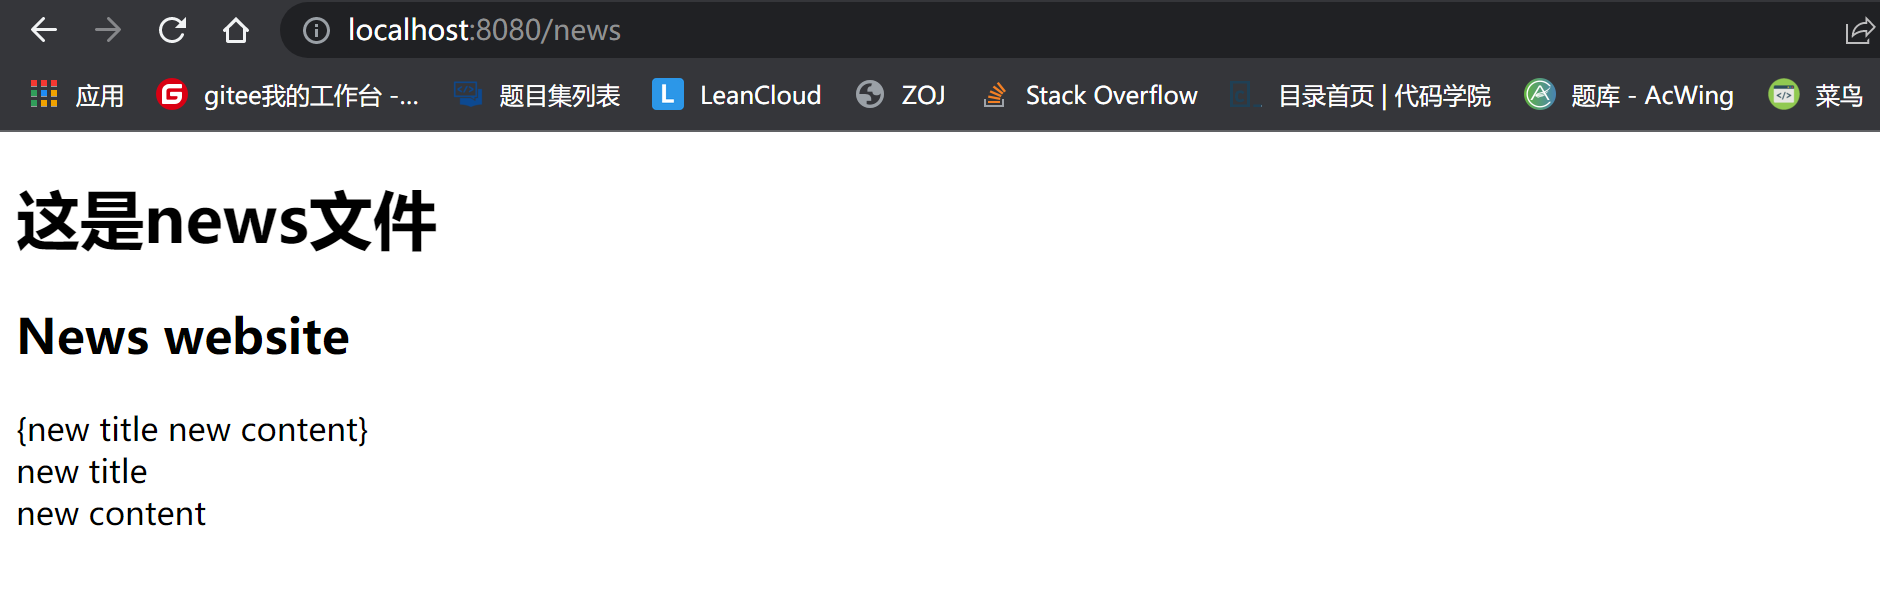
r.GET("/news", func(c *gin.Context) {
n := &New{
Title: "new title",
Content: "new content",
}
c.HTML(http.StatusOK, "news.html", gin.H{
"title": "News website",
"news": n,
"t": "t",
})
})
r.Run()
}
index.html 文件:
<!DOCTYPE html>
<html lang="en">
<head>
    <meta charset="UTF-8">
    <meta http-equiv="X-UA-Compatible" content="IE=edge">
    <meta name="viewport" content="width=device-width, initial-scale=1.0">
    <title>Document</title>
</head>
<body>
    <h1>这是index文件</h1>
    <!-- 渲染 -->
    <h2>{{.title}}</h2>

    <h3>t = {{.t}}</h3>
    {{$t = .title}}  <!-- 定义变量 -->
    {{$t}}  <!-- 使用变量 -->
    {{$t = 30 }}  <!-- 修改变量 -->
    {{$t}}  <!-- 使用变量 -->
    <h3>{{.t}}</h3>
</body>
</html>
news.html 文件:
<!DOCTYPE html>
<html lang="en">
<head>
    <meta charset="UTF-8">
    <meta http-equiv="X-UA-Compatible" content="IE=edge">
    <meta name="viewport" content="width=device-width, initial-scale=1.0">
    <title>Document</title>
</head>
<body>
    <h1>这是news文件</h1>
    <!-- 渲染 -->
    <h2>{{.title}}</h2>
    <!-- 访问news -->
    <div>
        {{.news}}  <!-- 拿到结构体对象 -->
    </div>
    <div>
        {{.news.Title}}  <!-- 拿到结构体对象的属性 -->
    </div>
    <div>
        {{.news.Content}}  <!-- 拿到结构体对象的属性 -->
    </div>
    <div>

    </div>
</body>
</html>
🚀 编译结果如下:

预定义函数
预定义函数浏览⚡
预定义的全局变量:
- 通过
{{.}}访问结构体对象 - 通过
{{.属性名}}访问结构体对象的属性 .当前对象..父对象index当前对象的索引len当前对象的长度urlquery当前对象的URL编码js当前对象的JavaScript编码html当前对象的HTML编码json当前对象的JSON编码xml当前对象的XML编码yaml当前对象的YAML编码csv当前对象的CSV编码tsv当前对象的TSV编码urlpath当前对象的URL路径编码slice当前对象的切片first当前对象的第一个元素last当前对象的最后一个元素sort当前对象的排序reverse当前对象的反转and当前对象的逻辑与or当前对象的逻辑或not当前对象的逻辑非eq当前对象的等于ne当前对象的不等于lt当前对象的小于le当前对象的小于等于gt当前对象的大于ge当前对象的大于等于add当前对象的加法sub当前对象的减法mul当前对象的乘法div当前对象的除法mod当前对象的取模call当前对象的函数调用print当前对象的打印printf当前对象的格式化打印println当前对象的换行打印
常用的内置函数和自定义模板函数
💡简单的一个案例如下(main.go 文件):
package main

import (
	"fmt"
	"html/template"
	"net/http"

	"github.com/gin-gonic/gin"
)

type New struct {
	Title   string `json:"this is 新闻标题"`
	Content string `json:"this is 新闻内容"`
}

// 自定义模板函数
func Text(title string) string {
	fmt.Println("title:", title)
	return title + " this is 自定义模板函数Text"
}

func Text2(title string, content string) string {
	fmt.Println("title:", title, "content:", content)
	return title + " " + content + " this is 自定义模板函数Text2"
}

func main() {
	r := gin.Default()

	// 加载自定义模板函数
	r.SetFuncMap(template.FuncMap{
		"Text":  Text,
		"Text2": Text2,
	})

	//html: http://localhost:8080/
	r.LoadHTMLGlob("templates/*") //表示加载templates文件夹下的所有文件
	r.GET("/", func(c *gin.Context) {
		c.HTML(http.StatusOK, "index.html", gin.H{
			"title":  "this is a title",
			"msg":    "this is a msg",
			"score":  99,                          //score是int类型,表示分数
			"score2": 99.9,                        //score2是float64类型,表示分数
			"score3": "99.9",                      //score3是string类型,表示分数
			"hobby":  []string{"篮球", "足球", "乒乓球"}, //hobby是切片类型,表示爱好  //hobby是切片类型,表示爱好
			"map": map[string]interface{}{ //map是map类型,表示地图
				"address": "北京市海淀区",
				"tel":     "010-12345678",
			},

			//结构体
			"news": &New{
				Title:   "新闻标题",
				Content: "新闻内容",
			},
		})
	})

	r.Run()
}
index.html 文件:
<!DOCTYPE html>
<html lang="en">
<head>
    <meta charset="UTF-8">
    <meta http-equiv="X-UA-Compatible" content="IE=edge">
    <meta name="viewport" content="width=device-width, initial-scale=1.0">
    <title>Document</title>
    <!-- 缩小h6间距 -->
    <style>
        h6 {
            margin: 0;
        }
    </style>

</head>
<body>
    <h3>这是index文件</h3>
    <!-- 渲染 -->
    <h6>titls = {{.title}}</h6>
    <h6>msg = {{.msg}}</h6>
    <h6>score(int类型分数) = {{.score}}</h6>
    <h6>score2(float64类型分数) = {{.score2}}</h6>
    <h6>score3(string类型分数) = {{.score3}}</h6>
    <h6>hobby(切片类型爱好) = {{.hobby}}</h6>
    <h6>map(地图) = {{.map}}</h6>
    <h6>news(结构体) = {{.news}}</h6>
    <h6>news.Title(结构体属性) = {{.news.Title}}</h6>

    <!-- 求msg长度 -->
    <h6>msg长度 = {{len .msg}}</h6>

    <!-- 判断msg是否为空 -->
    <h6>msg是否为空 = {{if .msg}}不为空{{else}}为空{{end}}</h6>

    <!-- 判断score是否大于60 -->
    <h6>score是否大于60 = {{if gt .score 60}}大于60{{else}}小于60{{end}}</h6>

    <!-- 遍历hobby -->
    <h6>hobby(切片类型爱好) = {{range .hobby}}{{.}} {{end}}</h6>

    <!-- 遍历map -->
    <h6>map(地图) = {{range $key, $value := .map}}{{$key}} = {{$value}} {{end}}</h6>

    <!-- 自定义模板函数
        直接在模板中调用,比如下面的函数,直接在模板中调用
    -->
    <h3>自定义模板函数/h3>
    <h6>自定义模板函数 = {{Text .title}}</h6>
    <h6>自定义模板函数2 = {{Text2 .title .msg}}</h6>
</body>
</html>
🚀 编译结果如下:

加载一个公共的模板
加载一个公共的模板,也可以叫做嵌套 template
我们一个项目里面可能有一个公共的头部或者尾部,就像我们这个仓库一样,每一页都有一个模板:
在每个html 文件的任意位置都可以使用, 注意后面的 .
<!-- 公共模板 头部-->
{{template "public/page_header.html" .}}

<!-- 公共模板 尾部-->
{{template "public/page_footer.html" .}}
public/page_header.html 文件
<!-- 相当于给模板定义一个名字,define end 成对出现 -->
{{define "public/page_foorter"}}
<!DOCTYPE html>
<html lang="en">
<head>
    <meta charset="UTF-8">
    <meta http-equiv="X-UA-Compatible" content="IE=edge">
    <meta name="viewport" content="width=device-width, initial-scale=1.0">
    <title>Document</title>
    <style>
        h1{
            color: blue;
            background-color: yellow;  /* 背景色 */
            text-align: center;  /* 文字居中 */
        }
    </style>
</head>
<body>
    <h1>this is a public test page - footer</h1>

</body>
</html>
public/page_footer.html 文件:
<!-- 相当于给模板定义一个名字,define end 成对出现 -->
{{define "public/page_header"}}
<!DOCTYPE html>
<html lang="en">
<head>
    <meta charset="UTF-8">
    <meta http-equiv="X-UA-Compatible" content="IE=edge">
    <meta name="viewport" content="width=device-width, initial-scale=1.0">
    <title>Document</title>
    <style>
        h1{
            color: red;
            background-color: yellow;  /* 背景色 */
            text-align: center;  /* 文字居中 */
        }
    </style>
</head>
<body>
    <h1>this is a public test page</h1>
</body>
</html>
路由传值
路由(Routing)是由一个 URL 和 HTTP 方法(get、post)等组成
Get传值
💡简单的一个案例如下:
// Get传值
//html: http://localhost:8080/newst?title=新闻标题&content=新闻内容
r.GET("/newst", func(c *gin.Context) {
	title := c.Query("title")
	content := c.Query("content")

	c.JSON(http.StatusOK, gin.H{
		"title":   title,
		"content": content,
	})
})
🚀 编译结果如下:

**同样也可以传递给 html **
END 链接
✴️版权声明 © :本书所有内容遵循CC-BY-SA 3.0协议(署名-相同方式共享)©