beego框架
[toc]
beego框架
beego 是免费、开源的软件,这意味着任何人都可以为其开发和进步贡献力量。beego 源代码目前托管在 Github 上,Github 提供非常容易的途径 fork 项目和合并你的贡献。
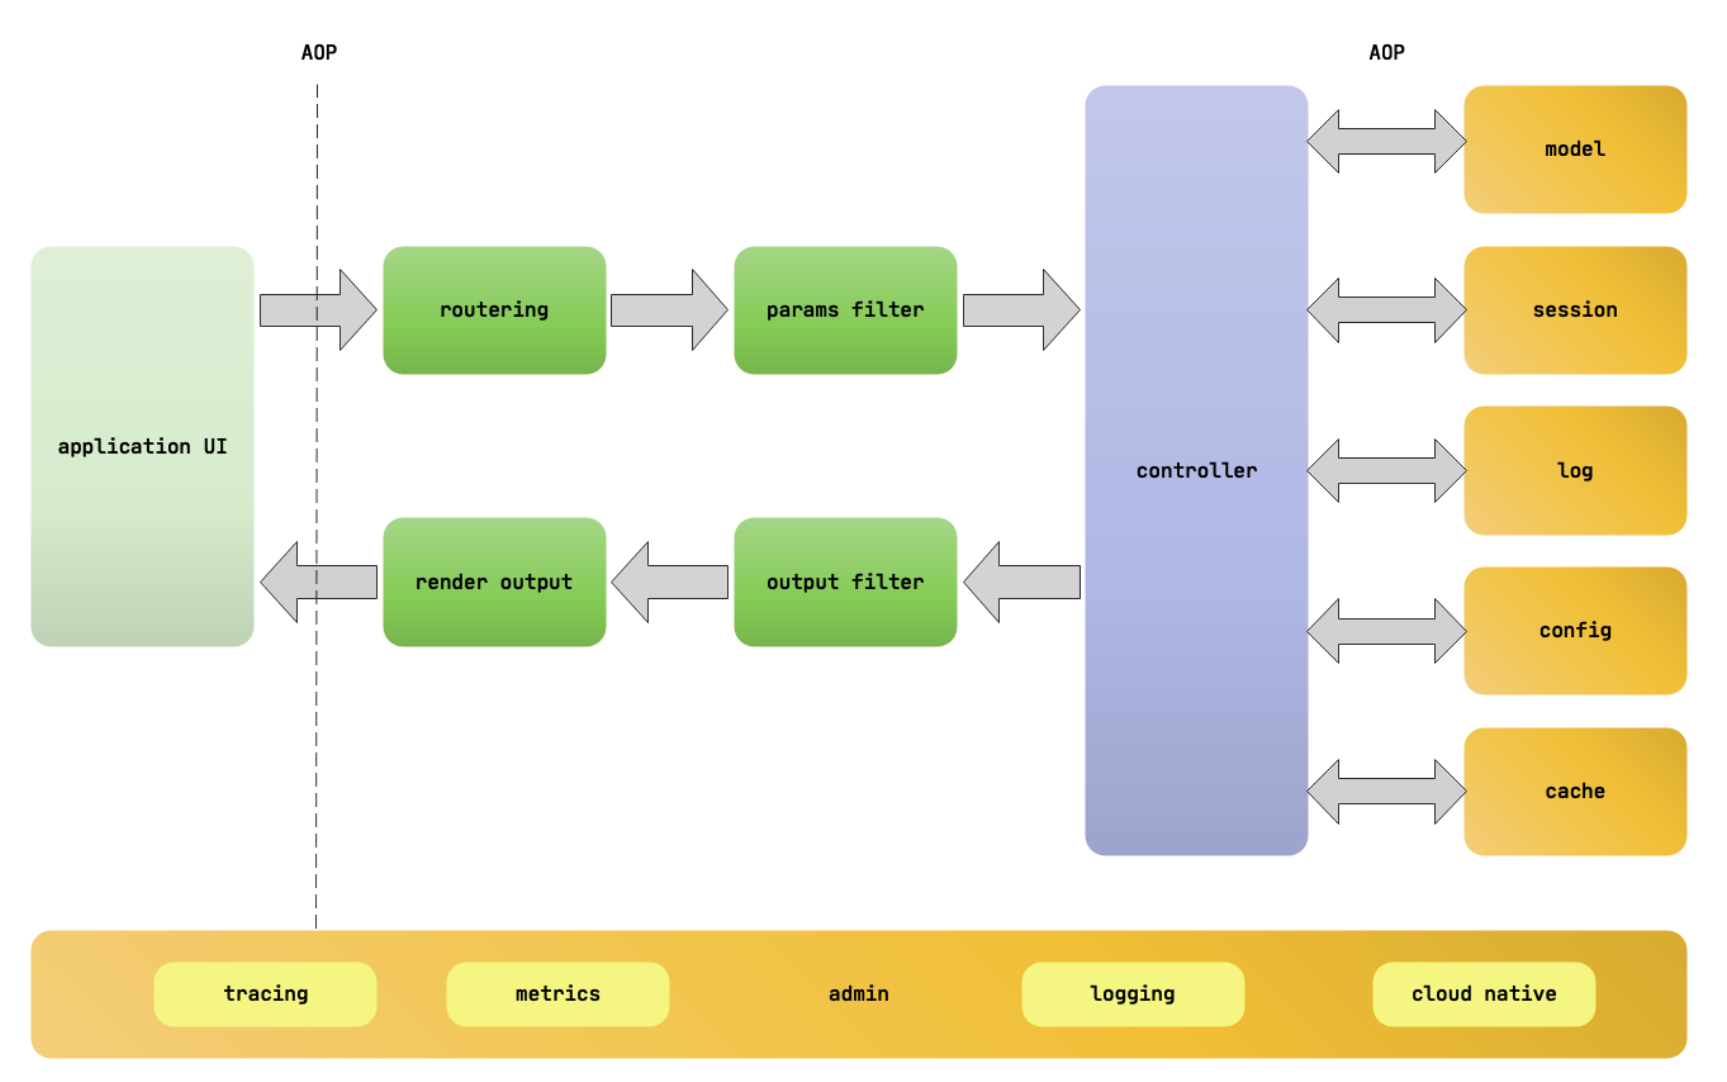
架构图:
beego由四部分组成
- 基础模块:包括log模块、config模块、governor模块;
- Task:用于运行定时任务或周期性任务;
- 客户端:包括ORM模块、httplib模块、缓存模块;
- 服务器:包括网页模块。未来我们会支持gRPC;
web应用程序:
beego 的安装
beego 的安装是典型的 Go 安装包的形式:
go get github.com/astaxie/beego
常见问题:
git 没有安装,请自行安装不同平台的 git,如何安装请自行搜索。
git https 无法获取,请配置本地的 git,关闭 https 验证:
git config --global http.sslVerify false无法上网怎么安装 beego,目前没有好的办法,接下来我们会整理一个全包下载,每次发布正式版本都会提供这个全包下载,包含依赖包。
beego 的升级
beego 升级分为 go 方式升级和源码下载升级:
Go 升级,通过该方式用户可以升级 beego 框架,强烈推荐该方式:
go get -u github.com/astaxie/beego源码下载升级,用户访问
https://github.com/astaxie/beego,下载源码,然后覆盖到$GOPATH/src/github.com/astaxie/beego目录,然后通过本地执行安装就可以升级了:go install github.com/astaxie/beego
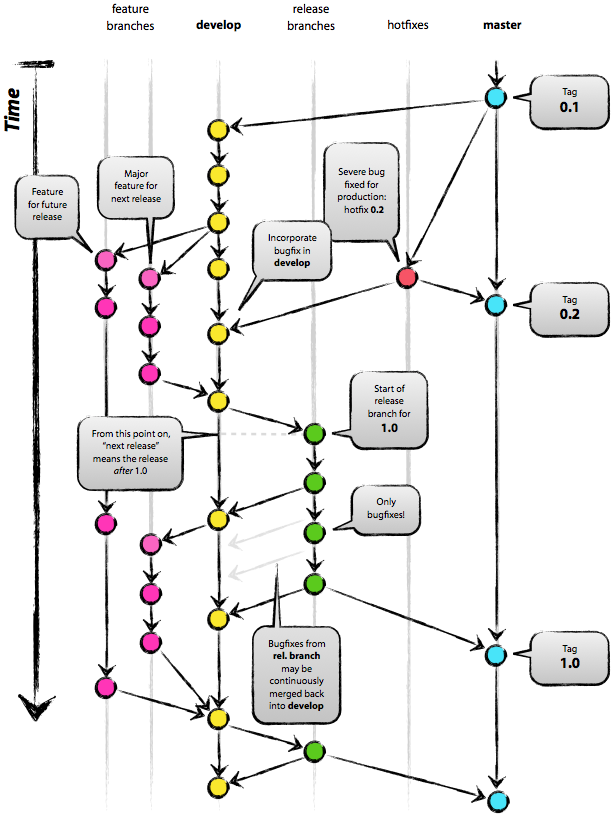
beego 的 git 分支
beego 的 master 分支为相对稳定版本,dev 分支为开发者版本。大致流程如下:
快速入手
Create hello directory, cd hello directory
mkdir hello
cd hello
Init module
go mod init
Download and install
go get github.com/beego/beego/v2@latest
Create file hello.go
package main

import "github.com/beego/beego/v2/server/web"

func main() {
	web.Run()
}
Build and run
go build hello.go
./hello
Go to http://localhost:8080
Congratulations! You've just built your first beego app.

bee工具的使用
bee 工具是一个为了协助快速开发 beego 项目而创建的项目,通过 bee 您可以很容易的进行 beego 项目的 创建、热编译、开发、测试、和部署 。
bee 工具的安装
您可以通过如下的方式安装 bee 工具:
go get github.com/beego/bee
安装完之后,bee 可执行文件默认存放在 $GOPATH/bin 里面,所以您需要把 $GOPATH/bin 添加到您的环境变量中,才可以进行下一步。
如何添加环境变量,请自行搜索 如果你本机设置了
GOBIN,那么上面的命令就会安装到GOBIN下,请添加 GOBIN 到你的环境变量中
bee 工具命令详解
我们在命令行输入 bee,可以看到帮助的信息
bee
bee version
new 命令
new 命令是新建一个 Web 项目,我们在命令行下执行 bee new <项目名> 就可以创建一个新的项目。但是注意该命令必须在 $GOPATH/src 下执行。最后会在 $GOPATH/src 相应目录下生成如下目录结构的项目:
bee new myproject
[INFO] Creating application...
/gopath/src/myproject/
/gopath/src/myproject/conf/
/gopath/src/myproject/controllers/
/gopath/src/myproject/models/
/gopath/src/myproject/static/
/gopath/src/myproject/static/js/
/gopath/src/myproject/static/css/
/gopath/src/myproject/static/img/
/gopath/src/myproject/views/
/gopath/src/myproject/conf/app.conf
/gopath/src/myproject/controllers/default.go
/gopath/src/myproject/views/index.tpl
/gopath/src/myproject/main.go
13-11-25 09:50:39 [SUCC] New application successfully created!
myproject
├── conf
│   └── app.conf
├── controllers
│   └── default.go
├── main.go
├── models
├── routers
│   └── router.go
├── static
│   ├── css
│   ├── img
│   └── js
├── tests
│   └── default_test.go
└── views
    └── index.tpl

8 directories, 4 files
controllers
controllers
controllers里面内嵌了一个结构体,将 beego的controllers,基于此实现自己的 Get() 等…
package controllers

import (
	"github.com/astaxie/beego"
)

type MainController struct {
	beego.Controller
}

func (c *MainController) Get() {
	c.Data["Website"] = "beego.me"
	c.Data["Email"] = "astaxie@gmail.com"
	c.TplName = "index.tpl"
}
不仅如此,或许我们可以添加自己的 Post()
func (c *MainController) Post() {
	c.Data["Website"] = "beego.me"
	c.Data["Email"] = "3293172751@qq.com"
	c.TplName = "index.tpl"
}

func (c *MainController) Put() {
	c.Ctx.WriteString("put")
}

func (c *MainController) Delete() {
	c.Ctx.WriteString("delete")
}

func (c *MainController) Head() {
	c.Ctx.WriteString("head")
}
controller 逻辑:
package controllers

import (
        "github.com/astaxie/beego"
)

type MainController struct {
        beego.Controller
}

func (this *MainController) Get() {
        this.Data["Website"] = "beego.me"
        this.Data["Email"] = "astaxie@gmail.com"
        this.TplName = "index.tpl"
}
1、声明了一个控制器 MainController,这个控制器里面内嵌了 beego.Controller,即Go 的嵌入方式,也就是 MainController 自动拥有了所有 beego.Controller 的方法。而 beego.Controller 拥有很多方法,其中包括 Init、Prepare、Post、Get、Delete、Head等方法。可以通过重写的方式来实现这些方法,以上例子重写了 Get 方法。
2、beego 是一个 RESTful 的框架,请求默认是执行对应 req.Method 的方法。例如浏览器的是 GET 请求,那么默认就会执行 MainController 下的 Get 方法。(用户可以改变这个行为,通过注册自定义的函数名)。
3、获取数据,赋值到 this.Data 中,这是一个用来存储输出数据的 map。
4、渲染模板,this.TplName 就是需要渲染的模板,这里指定了 index.tpl,如果用户不设置该参数,那么默认会去到模板目录的 Controller/<方法名>.tpl 查找,例如上面的方法会去 maincontroller/get.tpl(文件、文件夹必须小写)。用户设置了模板之后系统会自动的调用 Render 函数(这个函数是在 beego.Controller 中实现的),所以无需用户自己来调用渲染。
5、如果不使用模板可以直接输出:
func (this *MainController) Get() {
        this.Ctx.WriteString("hello")
}
api 命令
上面的 new 命令是用来新建 Web 项目,不过很多用户使用 beego 来开发 API 应用。所以这个 api 命令就是用来创建 API 应用的:
bee api apiproject
这个项目的目录结构如下:
apiproject
├── conf
│   └── app.conf
├── controllers
│   └── object.go
│   └── user.go
├── docs
│   └── doc.go
├── main.go
├── models
│   └── object.go
│   └── user.go
├── routers
│   └── router.go
└── tests
    └── default_test.go
从上面的目录我们可以看到和 Web 项目相比,少了 static 和 views 目录,多了一个 test 模块,用来做单元测试的。
同时,该命令还支持一些自定义参数自动连接数据库创建相关 model 和 controller: bee api [appname] [-tables=""] [-driver=mysql] [-conn="root:<password>@tcp(127.0.0.1:3306)/test"] 如果 conn 参数为空则创建一个示例项目,否则将基于链接信息链接数据库创建项目。
run 命令
我们在开发 Go 项目的时候最大的问题是经常需要自己手动去编译再运行,bee run 命令是监控 beego 的项目,通过 fsnotify监控文件系统。但是注意该命令必须在 $GOPATH/src/appname 下执行。 这样我们在开发过程中就可以实时的看到项目修改之后的效果:
bee run
我们打开浏览器就可以看到效果 http://localhost:8080/
bee run 做了什么
解析配置文件
beego 会自动解析在 conf 目录下面的配置文件
app.conf,通过修改配置文件相关的属性,我们可以定义:开启的端口,是否开启 session,应用名称等信息。执行用户的hookfunc
beego会执行用户注册的hookfunc,默认的已经存在了注册mime,用户可以通过函数
AddAPPStartHook注册自己的启动函数。是否开启 session
会根据上面配置文件的分析之后判断是否开启 session,如果开启的话就初始化全局的 session。
是否编译模板
beego 会在启动的时候根据配置把 views 目录下的所有模板进行预编译,然后存在 map 里面,这样可以有效的提高模板运行的效率,无需进行多次编译。
是否开启文档功能
根据EnableDocs配置判断是否开启内置的文档路由功能
是否启动管理模块
beego 目前做了一个很酷的模块,应用内监控模块,会在 8088 端口做一个内部监听,我们可以通过这个端口查询到 QPS、CPU、内存、GC、goroutine、thread 等统计信息。
监听服务端口
这是最后一步也就是我们看到的访问 8080 看到的网页端口,内部其实调用了
ListenAndServe,充分利用了 goroutine 的优势,一旦 run 起来之后,我们的服务就监听在两个端口了,一个服务端口 8080 作为对外服务,另一个 8088 端口实行对内监控。
其他热加载:
提示
同样也有 air 等热加载工具。
pack 命令
pack 目录用来发布应用的时候打包,会把项目打包成 zip 包,这样我们部署的时候直接把打包之后的项目上传,解压就可以部署了:
bee pack
我们可以看到目录下有如下的压缩文件:
-a--- 2022/11/21 16:56 16893719 beego.tar.gz
bale 命令
用来压缩所有的静态文件变成一个变量申明文件,全部编译到二进制文件里面,用户发布的时候携带静态文件,包括 js、css、img 和 views。最后在启动运行时进行非覆盖式的自解压。
generate 命令
这个命令是用来自动化的生成代码的,包含了从数据库一键生成 model,还包含了 scaffold 的,通过这个命令,让大家开发代码不再慢
bee generate scaffold [scaffoldname] [-fields=""] [-driver=mysql] [-conn="root:@tcp(127.0.0.1:3306)/test"]
    The generate scaffold command will do a number of things for you.
    -fields: a list of table fields. Format: field:type, ...
    -driver: [mysql | postgres | sqlite], the default is mysql
    -conn:   the connection string used by the driver, the default is root:@tcp(127.0.0.1:3306)/test
    example: bee generate scaffold post -fields="title:string,body:text"

bee generate model [modelname] [-fields=""]
    generate RESTful model based on fields
    -fields: a list of table fields. Format: field:type, ...

bee generate controller [controllerfile]
    generate RESTful controllers

bee generate view [viewpath]
    generate CRUD view in viewpath

bee generate migration [migrationfile] [-fields=""]
    generate migration file for making database schema update
    -fields: a list of table fields. Format: field:type, ...

bee generate docs
    generate swagger doc file

bee generate test [routerfile]
    generate testcase

bee generate appcode [-tables=""] [-driver=mysql] [-conn="root:@tcp(127.0.0.1:3306)/test"] [-level=3]
    generate appcode based on an existing database
    -tables: a list of table names separated by ',', default is empty, indicating all tables
    -driver: [mysql | postgres | sqlite], the default is mysql
    -conn:   the connection string used by the driver.
             default for mysql:    root:@tcp(127.0.0.1:3306)/test
             default for postgres: postgres://postgres:postgres@127.0.0.1:5432/postgres
    -level:  [1 | 2 | 3], 1 = models; 2 = models,controllers; 3 = models,controllers,router
migrate 命令
这个命令是应用的数据库迁移命令,主要是用来每次应用升级,降级的SQL管理。
bee migrate [-driver=mysql] [-conn="root:@tcp(127.0.0.1:3306)/test"]
    run all outstanding migrations
    -driver: [mysql | postgresql | sqlite], the default is mysql
    -conn:   the connection string used by the driver, the default is root:@tcp(127.0.0.1:3306)/test

bee migrate rollback [-driver=mysql] [-conn="root:@tcp(127.0.0.1:3306)/test"]
    rollback the last migration operation
    -driver: [mysql | postgresql | sqlite], the default is mysql
    -conn:   the connection string used by the driver, the default is root:@tcp(127.0.0.1:3306)/test

bee migrate reset [-driver=mysql] [-conn="root:@tcp(127.0.0.1:3306)/test"]
    rollback all migrations
    -driver: [mysql | postgresql | sqlite], the default is mysql
    -conn:   the connection string used by the driver, the default is root:@tcp(127.0.0.1:3306)/test

bee migrate refresh [-driver=mysql] [-conn="root:@tcp(127.0.0.1:3306)/test"]
    rollback all migrations and run them all again
    -driver: [mysql | postgresql | sqlite], the default is mysql
    -conn:   the connection string used by the driver, the default is root:@tcp(127.0.0.1:3306)/test
dockerize 命令
这个命令可以通过生成Dockerfile文件来实现docker化你的应用。
例子:
生成一个以1.9.2版本Go环境为基础镜像的Dockerfile,并暴露9000端口:
bee dockerize -image="library/golang:1.9.2" -expose=8080
更多帮助信息可执行bee help dockerize.
打开 dockerfile 文件:
FROM library/golang:1.9.2

# Godep for vendoring
RUN go get github.com/tools/godep

# Recompile the standard library without CGO
RUN CGO_ENABLED=0 go install -a std

ENV APP_DIR $GOPATHD:\文档\最近的\awesome-golang\docs\code\beego
RUN mkdir -p $APP_DIR

# Set the entrypoint
ENTRYPOINT (cd $APP_DIR && ./D:\文档\最近的\awesome-golang\docs\code\beego)
ADD . $APP_DIR

# Compile the binary and statically link
RUN cd $APP_DIR && CGO_ENABLED=0 godep go build -ldflags '-d -w -s'

EXPOSE 8080
部署dockerfile
docker build -t mybeego:1.0 .
bee 工具配置文件
您可能已经注意到,在 bee 工具的源码目录下有一个 bee.json 文件,这个文件是针对 bee 工具的一些行为进行配置。该功能还未完全开发完成,不过其中的一些选项已经可以使用:
"version": 0:配置文件版本,用于对比是否发生不兼容的配置格式版本。"go_install": false:如果您的包均使用完整的导入路径(例如:github.com/user/repo/subpkg),则可以启用该选项来进行go install操作,加快构建操作。"watch_ext": []:用于监控其它类型的文件(默认只监控后缀为.go的文件)。"dir_structure":{}:如果您的目录名与默认的 MVC 架构的不同,则可以使用该选项进行修改。"cmd_args": []:如果您需要在每次启动时加入启动参数,则可以使用该选项。"envs": []:如果您需要在每次启动时设置临时环境变量参数,则可以使用该选项。
END 链接
✴️版权声明 © :本书所有内容遵循CC-BY-SA 3.0协议(署名-相同方式共享)©